UniConverter User Guide
-
Video Converter
- Convert DVD to Any Format | Wondershare UniConverter for Windows
- Add Media Files | Wondershare UniConverter for Windows
- Convert Video from Camcorder | Wondershare UniConverter for Windows
- Convert Videos for iPhone/iPad/Android Devices | Wondershare UniConverter for Windows
- Convert Videos for Social Network | Wondershare UniConverter for Windows
- Convert Videos from iOS & Android Devices | Wondershare UniConverter for Windows
- Convert Videos to Any Format | Wondershare UniConverter for Windows
- Convert Video to Audio | Wondershare UniConverter for Windows
- Mute Video | Wondershare UniConverter for Windows
- Add Audio to Video | Wondershare UniConverter for Windows
- Convert Videos to Any Format | Wondershare UniConverter for Mac
- Convert DVD to Video | Wondershare UniConverter for Mac
- Mute Video | Wondershare UniConverter for Mac
- Add Audio to Video | Wondershare UniConverter for Mac
-
Toolbox-all
- Image Converter | Wondershare UniConverter for Windows
- GIF Maker | Wondershare UniConverter for Windows
- Fix Video Metadata | Wondershare UniConverter for Windows
- CD Burner | Wondershare UniConverter for Windows
- Convert CD to MP3 | Wondershare UniConverter for Windows
- Convert Video to VR | Wondershare UniConverter for Windows
- Transfer Video/Audio Files to iOS Device | Wondershare UniConverter for Windows
- Transfer Video/Audio to Android Device | Wondershare UniConverter for Windows
- Transfer Video/Audio to External Hard Drive | Wondershare UniConverter for Windows
- Subtitle Editor | Wondershare UniConverter for Windows
- Watermark Editor | Wondershare UniConverter for Windows
- Smart Trimmer | Wondershare UniConverter for Windows
- Transfer | Wondershare UniConverter for Mac
- Image Converter | Wondershare UniConverter for Mac
- GIF Maker | Wondershare UniConverter for Mac
- Fix Media Metadata | Wondershare UniConverter for Mac
- CD Converter | Wondershare UniConverter for Mac
- CD Burner | Wondershare UniConverter for Mac
- VR Converter | Wondershare UniConverter for Mac
- Subtitle Editor | Wondershare UniConverter for Mac
- Watermark Editor | Wondershare UniConverter for Mac
- Smart Trimmer | Wondershare UniConverter for Mac
- Intro & Outro | Wondershare UniConverter
- Intro & Outro | Wondershare UniConverter for Mac
- Auto Reframe Video | Wondershare UniConverter
- Auto Reframe Video | Wondershare UniConverter for Mac
- AI Portrait | Wondershare UniConverter
- AI Portrait | Wondershare UniConverter for Mac
- Background Remover | Wondershare UniConverter for Windows
- Background Remover | Wondershare UniConverter for Mac
FAQs
How to Trim and Cut Videos on Mac Easily
With Wondershare UniConverter for Mac, you can easily trim and cut videos on Mac. You can remove the unwanted portions and merge the remaining parts into one. Multiple segments of a video file can also be created for playback and sharing. A real-time preview will help you edit the video easier on Mac. Read the detailed steps below.
How To Edit Video On Mac-Wondershare UniConverter (Mac) User Guide
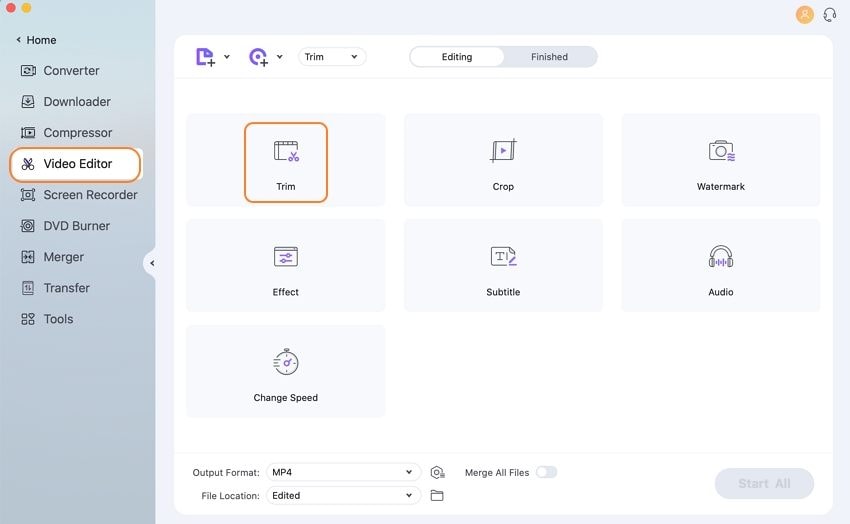
Step 1 Launch Wondershare UniConverter and import videos.
Download, install and run Wondershare UniConverter software on your Mac. On the Video Editor tab, click on the Trim section to browse and load the desired videos to the interface.
Step 2 Trim and cut videos easily.
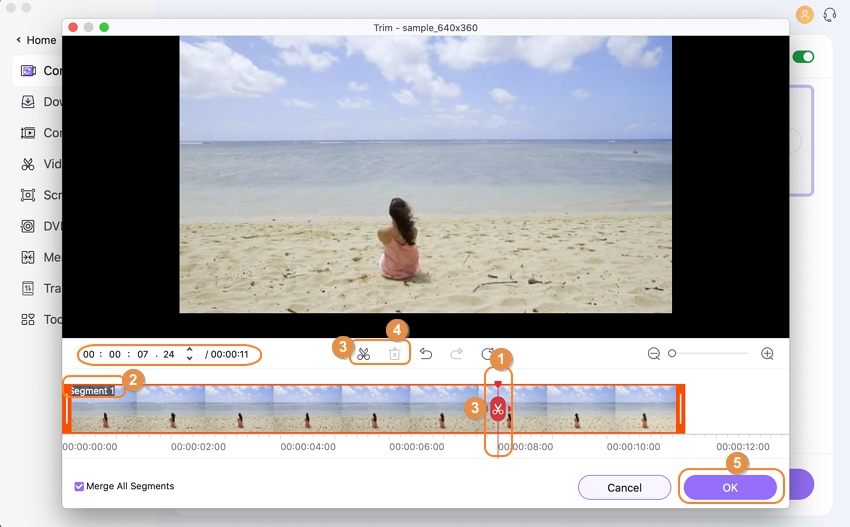
Click on the Scissor icon or the Trim button , and a new Trimming setting window will open. From here, the video can be trimmed and cut into multiple ways as required.
Move the slider on the trim window to select the video part that needs to be trimmed. You can even specify the exact time of the video part to be trimmed. Next, click on the Scissor icon, and the selected part will turn into a Segment. These ways, you can create multiple segments of your video file. Click on the Delete button for the segments that you want to remove from your video.
If you want to merge the remaining segments into a single file, click on the Merge all files file box. Else, the segments will appear on the main interface as individual segment videos.
Click on the Save button to confirm the changes.
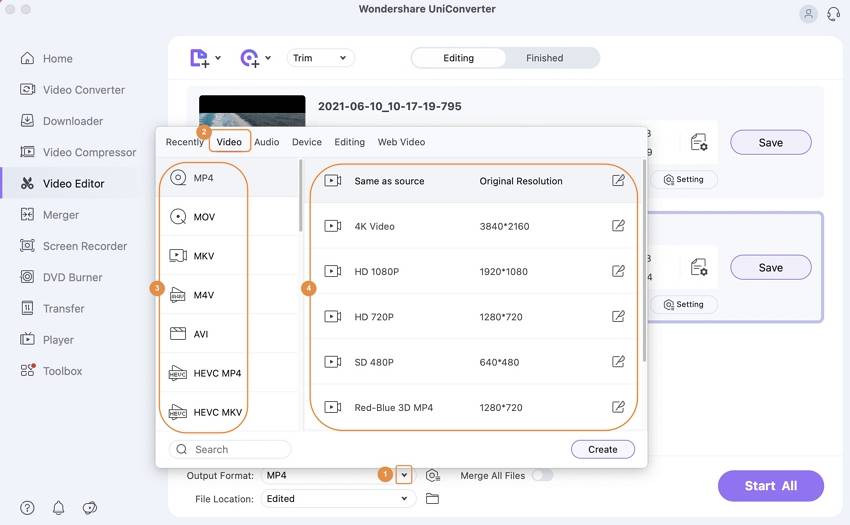
Step 3 Save trimmed videos on Mac.
Select the output format of the trimmed videos by opening the drop-down menu at the Output Format: tab. Choose an output format from the Video tab.
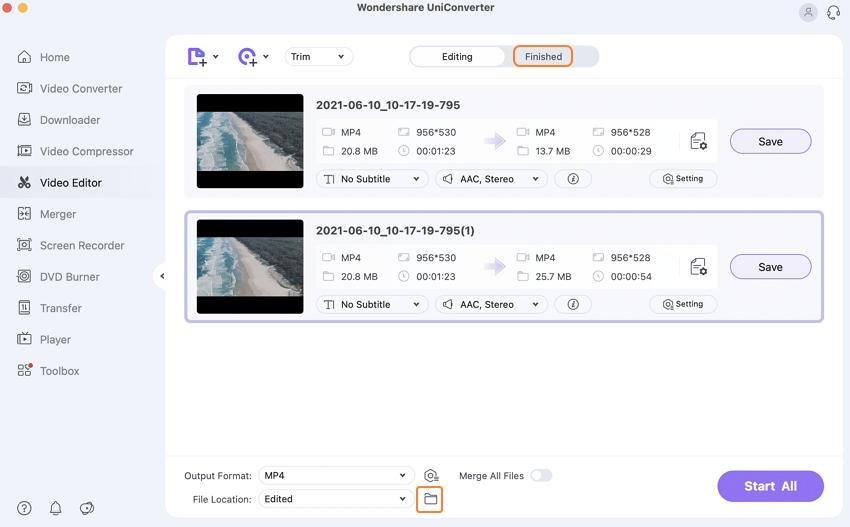
Finally, hitting on the Start All button will start saving edited videos to your Mac. Locate the trimmed videos on the Finished tab or at the File Location: tab easily.